Gunung Telapak Buruk via Jelebu (WW2 plane crash site)

Rated: 3.0/10

Gunung Telapak Buruk, a height of 1193m above sea level is well-known for it WW2 plane crash site. Gunung Telapak Buruk is situated in Seremban which is roughly an hour plus drive from Kuala Lumpur and although the mountain is 1193m high, your starting point elevation is already quite high and to reach the crash site, hiker will only need to climb down and up through a valley to get here. (Note: this site can also be reach from Pantai entrance where hiker will climb to Gunung Berembun peak and another 2 hours to hike down to the crash site)

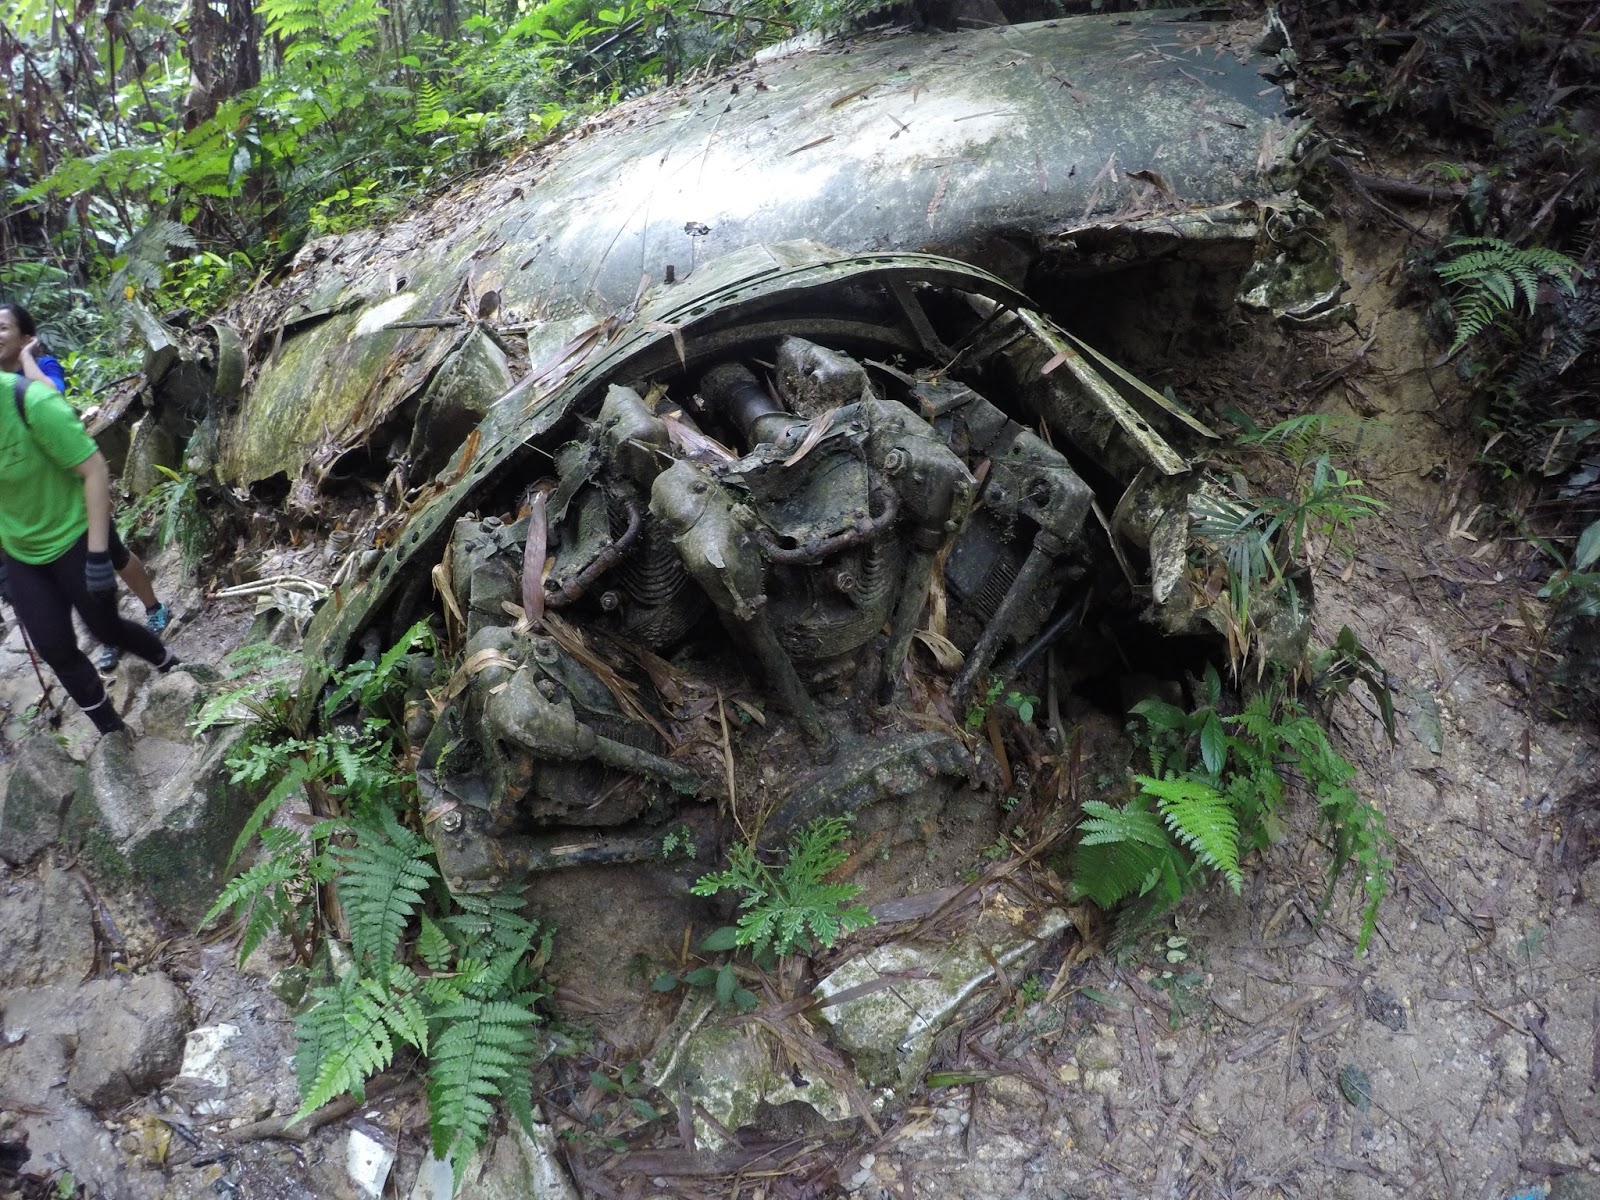
Here, you will be able to see the crash site of a B-24 Liberator though half of the plane is missing from the crash site. It is still a very different experience from most other hiking. To get here, use the following coordinate: "2.840246, 102.068981". There no public facility here. Permit and guide is not required at this point of time of writing.
The route from Monash University Malaysia to the entrance of the forest road
You will reach this point after an hour drive. Turn right into the forest road.

It may up to 45 minutes depending on your car type and who in front of you to the hike entrance

The road condition while driving up the forest road 


After the forest road drive, you will reach a T-junction. TM building is on the left, the hiking entrance is on the right

A TM building
The hiking entrance

The road condition up to the hike entrance is bad but does not require a 4 wheels drive up. During this time of writing, a normal Myvi manage to reach the top, and a Perodua Bezza with 4 people in the car also did make it to the top. Just make sure your car brake is in good condition and your car isn't too low to the ground. After the 11km drive, you will reach a T-junction where on your left is a TM building and on the right is the hiking entrance. Cars were park on the side of the road before the T-junction.

The hiking profile:

A hike to the crash site (Apps: Mapmyhike)

The hiking start with a steep drop down to the valley and straight to the crash site. It around 2 hours+ of hiking and the trail are marked with a distance marker supposedly every 50m. You will reach Gunung Telapak Buruk after the marker read 2500m. Though this is not the end yet but here if you look to the left, you can start seeing crash debris. The main crash site is on the right where is another 200m downhill to the wing debris and another 100m through the small river after to the tail of the plane.

The last marker before Gunung Telapak Buruk though the trail is not really 2.5km far


Gunung Telapak Buruk (Looking left too see a plane debris,  going straight bring you another 2 hours up to Gunung Berembun, and going down right will bring you to the crash site)


Some of the crash debris (There is a lot more but definitely not showing everything here!!)

The hike is fairly easy for an average hiker but hiker need to take note that they will have to climb back up while going back to their car. The crash site is already 70+ years old so do not sit nor stand on the debris. Also note that this area is the burial area for all the crew who were on board of the plane so respect the area and DO NOT take any souvenirs home nor leave any rubbish in the area!! Overall it a very different hiking experience as you don't usually see these in nature where it is still well preserve by nature itself! 

Side note: If you do not want to go through the forest road, you can still reach Gunung Telapak Buruk from Pantai side by you would have to climb to Gunung Berembun peak and another 2 hours hike toward Gunung Telapak Buruk (I have not taken this route hence I do not know how long nor how far this route is)
Last Edited:
9 February 2017

Gunung Kerinci via Kersik Tuo

Gunung Kerinci, a volcanic mountain with a height of 3805m, it the highest active volcano mountain in Indonesia and South East Asia. Though the difference in height between Rinjani and Kerinci is only 80m, hiking Mount Kerinci is definitely much easier than hiking in Rinjani. A guide is definitely a must for this hike. Our guide for the trip was by a simple man alone with his group of porter, Mr Endatno Een (+62 852 6626 6992). Though it may not be as grand as Rinjani, he really did make this trip a memorable one. 

It was initially meant to be a 3D2N hike but we manage to do it in 2D1N and it is definitely recommended to do so. Did I make Gunung Kerinci sound easy? Well, it is relatively easier compare to Gunung Rinjani as all of us make it to the top unlike Rinjani where only half of us make it to the top, but it is still tougher than Mount Kinabalu and best it not to underestimate it.

On day one, we started our hike 10 minutes away from the entrance of the mountain, Pintu Rimba which is already 1809m high at 9am. It a short walk along the farm with a beautiful view of Gunung Kerinci to Pintu Rimba where the forest hike start. the trail from Pintu Rimba to the first checkpoint, Bangku Panjang and second checkpoint, Batu Lumut is an easy hike, both taking only roughly half an hour to reach. There is nothing much to see here though, a quick rest and we were on our way.

From Batu Lumut to the third checkpoint, Shelter 1 it took us 1 and the half hour to climb as the trail start to steepen, but it still ain't that bad. We had our lunch here while enjoying the view of the mountain it provided. After an hour of resting and eating, we continue on our hike to the last checkpoint, Shelter 2 which is our campsite.

It took us around 2 hours and 15 minutes for us to hike up to Shelter 2, which is roughly 3000m above sea level. The trail up to Shelter 2 started to get tough and it almost similar to hiking from Camp Pacat to False Peak in Gunung Nuang. The campsite was good and the porter there really kept as company till the night, serving us "pisang goreng", peanut, instant cup noodle, fried chicken and rice for both tea time and dinner. At 8.30pm, we sleep in to prepare for the peak.

6 hours later, in the freezing cold night, we woke up at 2.30am. Luckily our breakfast came with hot tea and coffee with bread. After that, we pack our bag to bring only the necessary to the peak and left the others stuff in the tent. The hike to the peak start at 3.20am and we manage to reach the peak at 7am. The hike here isn't as bad as hiking in Rinjani, the rock here may be loose, but you won't lose one step for every two steps all the way up. During the hike up from Pintu Rimba, there isn't much view until 3,400m high where everything open up.

At the peak of the highest volcano in South East Asia, it is definitely breathtaking. Even though the view here may not be as grand as Rinjani, but it is special in it own way as here we get to see down into the crater of an active volcano. We also get a full 360 degree amazing view at the top and we were lucky to get a clear day when we were at the top. After that, we went down to our campsite at about 11am, had our lunch and packed up for the hike down to Pintu Rimba.

Basically, you only need to climb 2000m of it and the total journey is only 6.6km one way. so this hike is OK for adequate fit hiker. As mention before, the whole group manage to reach the peak unlike during the hike in Rinjani. Though the view for this mountain isn't much compare to Gunung Rinjani, but it is magnificent in it own ways. This mountain isn't popular too as it is not easy to accessed as it required 8 hours drive from Padang, Indonesia to reach Kersik Tuo. But it is recommended? Definitely yes for me!

Thing we brought up:                                
A few cloths                                                
Sunscreen                                                    
Sunglasses                                                  
Walking sticky
Camera
Extra food snack
Toiletries, paper, plastic
Torch Light / Headlamp
Long Jones and Jacket and Glove

Thing we don't have to bring up (porter help):
2 days of foods and water (for water, ask your guide how much will the porter bring for you)
Tent and sleeping bag


Being transport to the base of Mount Kerinci

Mount Kerinci

The hike start


One of the view during the hike

The Hike

The Hike 


The Camp Site

The HIke


The Hike


The Hike

The Hike

Nearing the peak

The Peak

The Peak

The inside of an active volcano crater

All of us make it!

The peak


Gunung Angsi (A trans-hike from Ulu Bendol - Bukit Putus)

Distance: 14km
Elevation Gain: 900m
Rated: 4.5/10

Gunung Angsi, a mountain with a height of 824m tall, not far behind Gunung Datuk can be done within a day. The hike is a trans-hike across the hill which mean you start from one point of the mountain and end the hike on the other side of the mountain. For Gunung Angsi, it is one of the better hike to do a trans-hike as going down on the Ulu Bendol side can be "challenging". It take rought 2-3 hours up and 1-1.5 hours down the other side. To do a trans-hike at Gunng Angsi, go to [2.7274921, 102.058325] where you will see a parking area with a monument in it. The parking area has no facility but as when walking to Ulu Bendol, they have everything except you have to pay 50sen for toilet.


Map to Parking Area, (2.7274921, 102.058325) from Monash Universiy Malaysia


A walk to Ulu Bendol to the foot of Ulu Bendol
After parking the car at Jalan Bukit Putus, one have to take a half an hour walk along the road to Ulu Bendul recreation park. As mention, there are a lot of facility here and recreational waterfall, but most facility won't be open till the late morning. Five minutes after walking from Ulu Bendul entrance alongside the river, there will be pavement road and on the right will be the guard house where you have to pay RM5 entrance fee for hiking Gunung Angsi. After that, the hike up to Gunung Angsi start.

The first hours of the hike, you will be walking alongside the river on your right and with piping along the trail. You will also walk pass two "checkpoint". You will also need to cross the knee deep river during the hike. After an hour hike, the gradient of the hike will start to steepen greatly and will take another an hour plus to reach the peak. Along the hike, there will be a almost 90 degree wall to climb with rope. There are two path here where the right one is easier but the later path is tougher, whereas the left path will be tougher but later path is easier. The path from the start to the end is simple and there was no major split road during the time which I was climbing.

After all that, you have reached the peak of the mountain! It is a nice place to rest here with shade around the place when it get too hot, though, the view isn't much (and yes, on the way up, there isn't much of the view too). To descend to the other side of the hill, take the path right opposite of where you initially came up from. It a simple trail down and there is more view side to see along the way. Just keep taking the main path down to avoid getting lost till you reach a "very-obvious" Y-junction, take left here. (Side note, I got shock when I saw this junction road since it was my first time here and this mountain trail by right is supposed to be clear and obvious, to make thing worst, on both trail, I remember seeing marker also... Trusted my instinct and guess I got lucky!)

Head left at this junction

On the way down, there is a "pondok" with a "stall" nearby. They serve food and drink. While I was there, they told me the food and drink are free but to wash all the culinary after you used. Do ask the keeper there to check first as I not a 100% sure of this. After that, it a steep way down and to the end of the hike. After reaching the end, you will have to walk a bit more down the road to where you park your car.

A small walk to the car after the end of the hike
Hiking route profile


Gunung Angsi (Ulu Bendul side) (Apps: Mapmyhike)


Gunung Angsi (Bukit Putus side) (Apps: Mapmyhike)
Picture of Gunung Angsi

Car Park area
Ulu Bendol rest stop / Gunung Angsi start point

Almost at the start of the hike. Walk till you see pavement road and turn left to pay for tix entry (RM5)

The ticket payment counter

The start of the hike

Hiking along some pipe system
River Crossing
The steep wall with rope

The peak

The peak

More Peak!!

One of the view while heading downward


Free food?? Do ask the keeper there first!

Entrance of Gunung Angsi from Jalan Bukit Putus (Entrance on the right, beginner hiker who want to hike this mountain can use this route)

Entrance of Gunung Angsi (Jalan Bukit Putus)


Overall, it is a good hike for hiker who want to experience what trans-hike feel like. Though, this kind of hike according to expert is not suitable for beginner hiker and I agree with it, unless you are able to hike mountain like Bukit Kutu or Nuang (Hulu Langat). For beginner hiker, you would still be able to hike this mountain using the road from Jalan Bukit Putus.


Last edited:
15 August 2016